Dryer vent cleaning is an essential but often overlooked task that homeowners should prioritize. A clean dryer vent not only promotes the efficiency of your dryer but also significantly reduces the risk of potential hazards, including house fires. Over time, lint and debris can accumulate in your dryer vent, obstructing airflow and leading to overheating. By taking the initiative to clean your dryer vent yourself, you can save on professional service costs while ensuring your home remains safe and your laundry routine efficient. This step-by-step guide will walk you through the DIY process of cleaning your dryer vent.
Why Clean Your Dryer Vent?
Before diving into the cleaning process, it’s important to understand why this task is so vital:
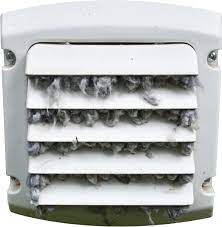
- Fire Safety: Lint accumulation in dryer vents is highly flammable. According to the National Fire Protection Association (NFPA), failure to clean dryer vents is one of the leading causes of home fires.
- Efficiency: A clogged vent restricts airflow, making your dryer work harder. This can lead to longer drying times, increased energy consumption, and ultimately, wear and tear on your appliance.
- Extended Equipment Life: Regular maintenance keeps your dryer running efficiently and extends its lifespan.
- Mold and Mildew Prevention: Excess moisture can lead to mold growth within the vent system, causing unpleasant odors and potential health risks.
Tools and Materials Needed
Before starting the cleaning process, gather the following tools and materials:
- Screwdriver
- Vacuum cleaner with a hose attachment
- Dryer vent cleaning brush (available at hardware stores)
- Flexible brush or lint trap cleaning tool
- Bubble level (optional)
- Dish soap and water (for cleaning the lint trap)
- Flashlight
Step-by-Step Cleaning Process
Step 1: Unplug the Dryer
Safety first! Always unplug your dryer before beginning any cleaning. This ensures there is no risk of it starting up while you are working and allows you to operate without worry.
Step 2: Move the Dryer Away from the Wall
Carefully pull your dryer away from the wall to access the vent. If necessary, ensure you have enough space to maneuver without damaging the appliance or fittings.
Step 3: Disconnect the Dryer Vent
Using a screwdriver, unscrew the clamp holding the venting hose to the back of the dryer. Gently pull the vent away from the dryer. Inspect the vent hose for damage or excessive wear and replace it if necessary.
Step 4: Inspect the Vent Duct
Take a moment to inspect the vent duct for signs of lint buildup. Shine a flashlight into the duct to look for any obstructions. If you notice any large clumps of lint, you may need to take extra measures to remove them.
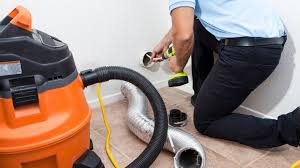
Step 5: Use the Vacuum Cleaner
Insert the vacuum cleaner’s hose into the vent duct. Start vacuuming to remove loose lint, debris, and dirt. Make sure to get as far into the duct as possible. If your vacuum has a hose attachment, this will help you reach deeper into the duct.
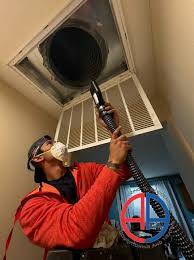
Step 6: Clean the Dryer Vent with a Brush
To effectively remove any stubborn lint and debris that the vacuum could not reach, use a dryer vent cleaning brush. Insert the brush into the duct, twisting and pushing it deeper into the vent. Work the brush back and forth, pulling it out periodically to check for lint buildup. Repeat this process until the vent feels clean.
Step 7: Clean the Lint Trap
While you’re at it, don’t forget to clean the lint trap inside the dryer. Remove the lint trap and wash it gently with warm, soapy water. Allow it to dry completely before putting it back into the dryer.
Step 8: Check the Outside Vent
Go outside to check the vent cap. Make sure it’s free from obstructions, such as bird nests or debris. If necessary, clean the outer vent with a cloth or soft brush. Ensure the flap opens and closes freely.
Step 9: Reassemble and Secure Everything
Once everything is clean, reattach the vent hose to the back of the dryer and secure it with screws. Double-check that all connections are tight to ensure no air leaks.
Step 10: Plug the Dryer Back In and Test
Push the dryer back into its original position and plug it in. Turn the dryer on for a few minutes on the air fluff or no-heat setting. This test ensures that air is flowing smoothly through the vent and that there are no remaining blockages.

Tips for Preventing Future Problems
After completing the cleaning process, it’s essential to take steps to prevent lint buildup in the future:
- Clean the Lint Trap After Every Use: Remove lint from the trap after every drying cycle to maximize airflow.
- Regular Maintenance: Aim to clean your dryer vent and duct at least once a year. If you frequently use your dryer, more frequent cleaning may be necessary.
- Upgrade to Rigid Ducts: If you have a flexible plastic or foil duct, consider replacing it with rigid metal ducting. Rigid ducts allow for better airflow and are less prone to lint buildup.
- Check the Outside Vent Monthly: Regularly inspect the outside vent to ensure it remains clean and unobstructed.
Conclusion
Cleaning your dryer vent is a straightforward and necessary task that can significantly benefit your home’s safety and energy efficiency. By following this step-by-step guide, you not only enhance your dryer’s performance but also contribute to a safer living environment. Remember, a well-maintained dryer vent is key to preventing potential hazards and ensuring your appliance operates at its best.
Moreover, taking the time to clean your dryer vent can lead to shorter drying times, which in turn reduces energy consumption and ultimately saves you money on your utility bills. As you make this a regular part of your home maintenance routine, feel free to educate family members or housemates about its importance to foster a culture of safety. If you encounter significant blockages or feel uncomfortable performing any part of the cleaning, don’t hesitate to reach out to professionals who specialize in dryer vent services. Happy cleaning!
Read more….Dryer Vent Cleaning Services


Leave a Reply